Call us at any time (904) 377-5084
Call us at any time (904) 377-5084

How a Pool Is Built
How a Pool Is Built: Step-by-Step Process (Fiberglass & Gunite)
Building an inground pool comes down to a series of steps that depend on the pool type.
A fiberglass pool is built around a pre-made shell: the yard is excavated, the shell is set and leveled, then it's plumbed, backfilled, decked, and finished.
A gunite (concrete) pool is built entirely on site: excavated, reinforced with steel, sprayed with concrete, cured, then tiled, finished, and decked. Below is what actually happens at each step, and why each one matters. (Wondering how long all this takes? See our pool build timeline.)
How a fiberglass pool is built, step by step
Fiberglass is popular in Northeast Florida because the pre-made shell suits our sandy soil and high water table well. Here's what each step involves, based on a real Jacksonville fiberglass build:
1. Design and shell selection. This is where a fiberglass build starts. Because the shell is manufactured in a fixed shape and size, what you're really designing is everything around it — where it sits in the yard, the decking layout, and the surrounding features. You choose a shell model that fits your space and style (for example, a Latham Corinthian 14 — a 14×30 shell with a built-in tanning ledge). Picking the right model up front is the key decision, because the shell's shape is locked once you order it.
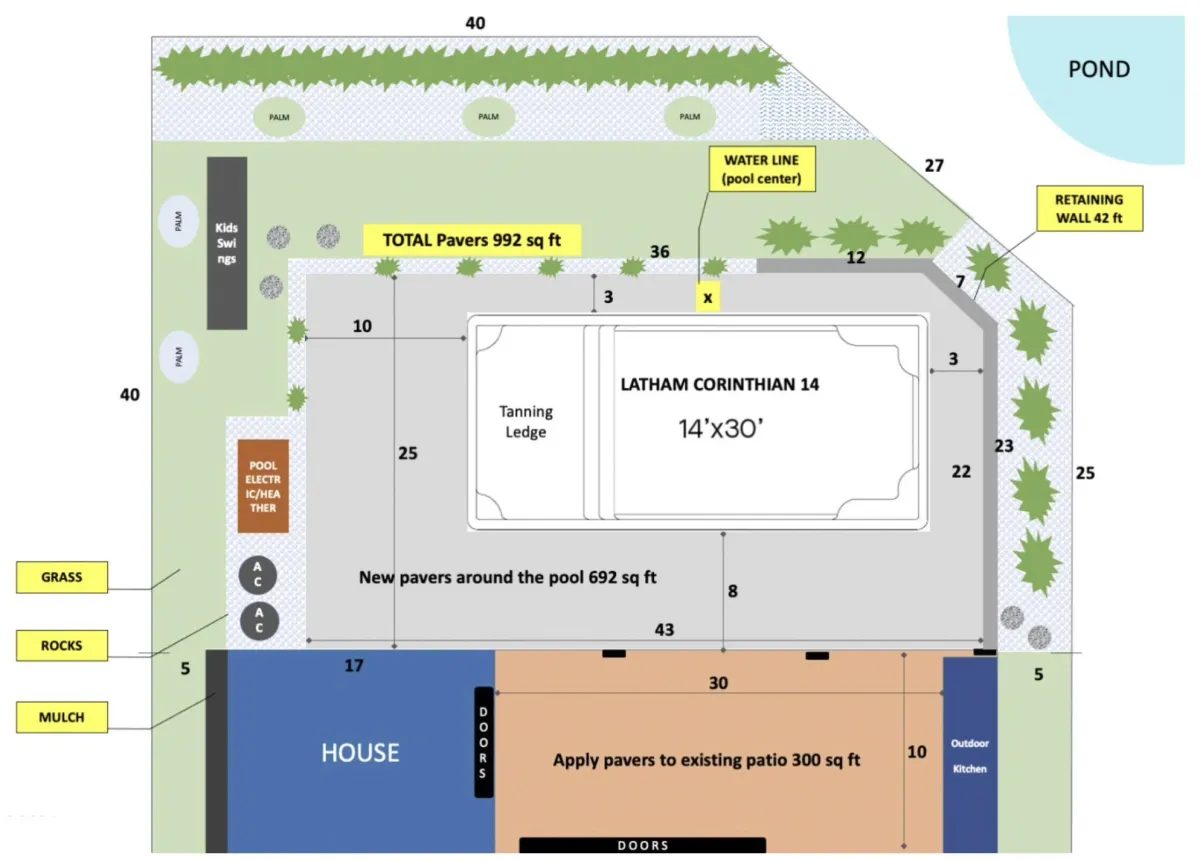
2. Permitting and staking the layout. Before any digging, the builder pulls the required permits and marks out the exact pool location in the yard — accounting for property setbacks, easements, and underground utility lines. Getting the placement right here prevents expensive problems later.
3. Excavation. The crew digs the hole to match the shell. In Northeast Florida's sandy, high-water-table soil, this usually means dewatering — actively pumping groundwater out of the hole during the dig so the excavation stays stable and workable. This is one of the trickier parts of building here, and where an experienced local crew matters.
4. Setting the shell. The shell is delivered and lowered into the excavation with a crane, then leveled with precision. This is the make-or-break step of a fiberglass build: the shell has to sit perfectly level, because everything after depends on it. A skilled crew takes their time here.
5. Plumbing and equipment. The plumbing lines are connected and the equipment pad is set up — pump, filter, and any heating or cooling. (In Florida, some homeowners add a heat pump or a heat/chill combo unit — though a chiller is rarely necessary here, since the water stays warm most of the year.)
6. Backfill and fill (done together). This step is unique to fiberglass and important to understand: the shell is backfilled around the outside while it's simultaneously filled with water inside. Doing both at once keeps the pressure balanced on the shell walls, so it stays level and properly seated as it settles. Rushing or unbalancing this step can shift the shell — another reason crew experience counts.
7. Decking and hardscape. Pavers, concrete, or stone decking goes in around the pool. This is where a lot of the finished look comes from — extended paver areas, a retaining wall if the yard's grade calls for one, and any surrounding hardscape.
8. Features, landscaping, and final finish. Water features, a screen enclosure if included (a common Northeast Florida add), landscaping, and final cleanup. A final inspection signs off the build, and it's ready to swim.
How a gunite (concrete) pool is built, step by step
Gunite pools are built entirely on site, which is exactly what lets them take any custom shape or size — but it means more steps and more craft happening in your backyard. The standard sequence:
1. Custom design and staking. Because a gunite pool can be any shape, the design step is bigger and more involved — custom geometry, depth transitions, attached spas, tanning ledges, and features are all designed up front. The builder then stakes the design out in the yard.
2. Permitting. County permits and any HOA approval, same as fiberglass.
3. Excavation. The custom shape is dug out. As with fiberglass, dewatering is common in Northeast Florida's wet soil — and a complex shape can make the dig more involved.
4. Steel (rebar). A grid of steel rebar is tied throughout the excavation, forming the pool's skeleton. This is what gives the concrete shell its structural strength.
5. Plumbing and electrical rough-in. Plumbing lines, main drains, returns, and electrical bonding are installed before the concrete goes on, since they'll be encased in it.
6. Shooting the gunite (shotcrete). The defining step: a concrete mix is sprayed under high pressure over the rebar and hand-shaped by the crew to form the pool's shell. This is skilled, hands-on work — the crew literally sculpts the pool — and it's what makes gunite fully custom.
7. Curing. The freshly shot gunite has to cure — a period where it's kept damp and left to harden and gain full strength. This is a step fiberglass simply doesn't have, and it can't be rushed.
8. Tile and coping. Waterline tile and the coping (the finished edge around the pool's rim) are installed.
9. Decking. Pavers, concrete, or stone decking around the pool, same as fiberglass.
10. Interior finish. The interior surface — plaster, aggregate, or a premium finish — is applied over the cured gunite. This is the last major step before the pool holds water, and it's what you actually see and feel on the pool's surface.
11. Fill, start-up, and finish. The pool is filled, the equipment is started and the water balanced, final landscaping and any enclosure go in, and a final inspection signs it off.
The key difference in how they're built
The core distinction: a fiberglass pool is manufactured off-site and assembled in your yard; a gunite pool is built from scratch on-site. That's why fiberglass has fewer steps and no curing period, while gunite involves rebar, sprayed concrete, curing, and an interior finish — more steps, more on-site craft, and complete design freedom in return
See how the two compare on cost, maintenance, and where each fits in the pool budget tiers. For how long each takes, see our pool build timeline.
Pool Build Process FAQ
What are the steps to build a fiberglass pool?
A fiberglass pool is built by selecting a pre-made shell, permitting and staking the layout, excavating the hole (with dewatering in Northeast Florida's wet soil), setting and leveling the shell with a crane, connecting plumbing and equipment, backfilling while filling the pool with water, adding decking, and finishing with features and landscaping.
What are the steps to build a gunite pool?
A gunite pool is built entirely on site: custom design and staking, permitting, excavation, tying steel rebar, plumbing and electrical rough-in, spraying (shooting) the gunite over the rebar, curing, installing tile and coping, decking, applying the interior finish, and finally filling and starting up the pool.
Why is dewatering part of building a pool in Jacksonville?
Northeast Florida has sandy soil and a high water table, so groundwater seeps into the excavation. Builders pump it out during the dig so the hole stays stable and the pool can be set or formed properly.
Why is setting the shell the most important step for fiberglass?
The shell has to sit perfectly level, because the decking, plumbing, and water line all depend on it. If it's not level, everything built around it is affected — which is why an experienced crew takes care with this step and with the balanced backfill-and-fill that follows.
What makes gunite fully customizable?
Gunite is sprayed as a concrete mix over a steel rebar frame and hand-shaped on site, so it can form any shape, size, or depth. Fiberglass, by contrast, comes as a pre-made shell in fixed shapes.